MR SIMMONS
A LEVEL
PHOTOGRAPHY //

PORTRAITURE
ASSIGNMENT
STUDIO LIGHTING AND PORTRAITURE.
STUDIO.
A portrait is the most common form of photography, from classic Victorian portraits to the modern "selfie" how we perceive others and ourselves has grown and evolved. But who is in control of how that person is perceived? the photographer or the model? Read the quotes below and consider what they mean and watch the video below to see how portraits appearance changes depending on the perception of the person.
"I never made a person look bad. They do that themselves. The portrait is your mirror. It’s you."
- August Sander
"I believe that photography can only reproduce the surface of things. The same applies to a portrait. I take photographs of people the same way I would take photographs of a plaster bust."
- Thomas Ruff
WATCH THIS VIDEO TITLED "DECOY" ABOUT 6 PHOTOGRAPHERS CAPTURING THE SAME MAN...
DIFFERENT LIGHTING SETUPS.
LOW, MID AND HIGH KEY LIGHTING.
Within a studio environment the photographer has full control of the intensity, direction and application of light upon their subject. Depending on the amount of lights and their creation of shadows and detail each style of lighting is called Low Key, Mid Key and High Key Lighting. Below you can see set up photographs and resulting images.


NATURAL LIGHTING
The great photographer Alfred Stieglitz famously said, “Wherever there is light, one can photograph.” The real question comes down to the quality of the light itself. Soft or harsh, warm or cool, direct or diffuse, the light you choose has a significant effect on any photograph.
On top of this you have to consider the subject matter, composition and many other factors that can impact the depiction of the subject. However, lighting is the key element that empowers your images and the message they hold.
Here is a selection of examples of how natural lighting, combined with other features, can be used to in portraiture. Click on each image below to see further information on how you could use each technique!
Your challenge is to create a series of portraits that tell us a narrative. Use lighting, composition and setting to tell the viewer a narrative abut a specific individual or location through capturing the people within the scene.
TECHNICAL ADVICE:
-
Set your aperture to the lowest possible to take advantage of a shallow depth of field as well as allowing as much light to enter your camera as possible.
-
Set your ISO to 400 initially to allow your camera to react quickly to the light. If you need to you can set it higher, however be mindful of the impact of noise on your images.
-
You have the option to go black and white if you feel this is most appropriate.
At the bottom of the page you will find some examples, from students, of how they have explored this theme. However, you should explore your own personal style and ideas.

Natural lighting from a window can work well as it becomes a directional source of light in your image. Perhaps use curtains to block some light out or to direct light. Remember, the closer you are to a window the stronger the light will be.

Reflectors are excellent pieces of kits that allow you to redirect available light to gain more control over how your subject is captured. A reflector can be very cheap and range in sizes and colours. If you are in need of one, but cannot purchase a proper one, you can use sheets of white paper, a large mirror or even a large surface covered in kitchen foil!

The background is just as important as your main subject and can help set the scene and atmosphere for the image. Look around you and consider if the background is adding to your work or distracting. Are there elements that need to be removed or taken out? Perhaps choose a different angle that does not include them? Your image does not have to follow the formula of a subject in front of a background and, like this image, you can have elements of your surroundings interacting with the subject.

Make sure to experiment with shadows, how they can emphasise or highlight different elements of your subjects. Experiment with different objects and the shadows they create. How can they enhance your portrait and add to its atmosphere.

Backlight is a great technique to allow for interesting and subtle images that also make use of strong shadows. Be mindful of your exposure and make sure that it is balanced to highlight your main subject. With such a strong light source behind your subject you are at risk of your subject becoming too dark.

You do not have to take single images only. You can explore capturing and presenting images together to enhance the narratives of your images. This can be done by showing two stages of a narrative or a close up of a specific detail.

If you cannot find interesting elements for your portraits add them yourself. This can be different objects, creating shadows etc.

Look carefully at the light around you as well as the time of day you are taking your images. Light at a low angle creates dramatic shadows and much more interest in terms of tones, shadows and 3D shape.

Consider your placement of the subject in the frame and how it helps tell the narrative of your piece. Do they always need to be close up?

Dark lighting can work wonders in terms of creating moody, effective images. However, you need to be aware of the impact on your exposure times. To achieve this you will have to explore raising your ISO rather high, which will result in noise, as well as watching your shutter speed carefully. However, if done well, this can be highly effective.
PHOTOGRAPHERS WHO HAVE USED NATURAL LIGHTING
Below are some photographers that have explored natural lighting within interior spaces.


STUDENT PRACTICAL EXAMPLES.
Here are some example of how past students have approached this topic.


EXPERIMENTAL STUDIO ARTISTS.
Use the following examples to influence your own ideas and concepts. Remember to use at least one artist one of OR another one from this list. Also remember to NOT copy the artist, but instead take influence and use their techniques and approach to explore your own ideas.


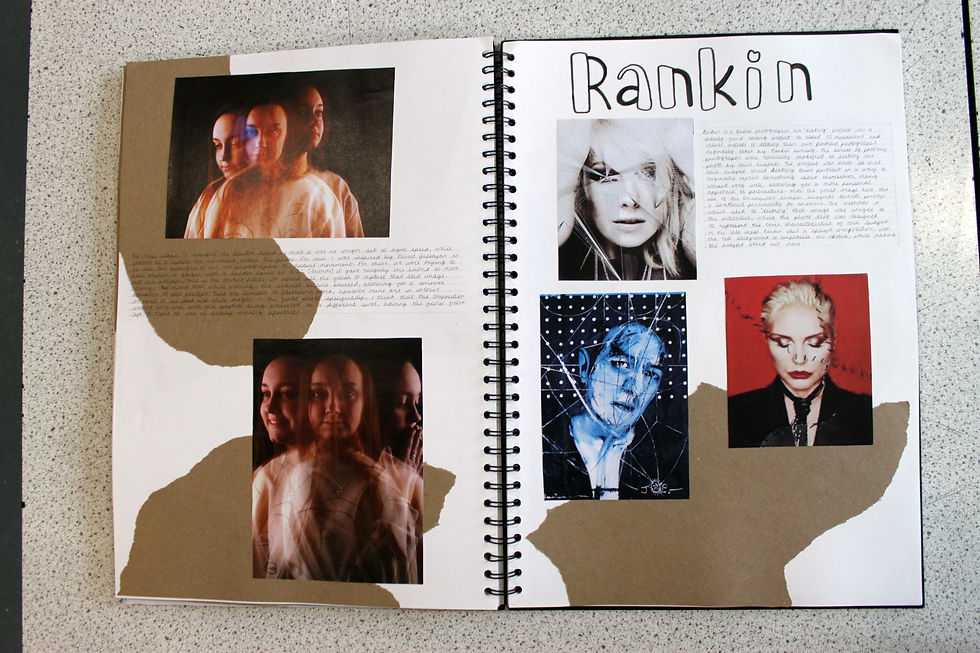
RANKIN "DESTROY" SERIES
Rankin created a series of portraits where he challenged musicians to "destroy" their own portraits to better represent themselves visually. Watch the video below to find out more.
RANKIN "DESTROY" SERIES EXAMPLES


INDEPENDENT STUDY.
Aim: To encourage you to explore the studio environment and its techniques, the nature of a portrait and how you can create creative outcomes using the different techniques.
Practical work: You are required to:
-
Create a title page explaining the task and how you approached it.
-
Create a brainstorm exploring the theme and its relevant ides and concepts. What are the different technical elements involved in studio portraiture? What is Low, MId and High Key Lighting? What other creative techniques can you explore? (Shutter blur, Flash Blur, Use of Gels, Projections onto subject for example).
-
Take two images per lighting set up but with the lights positioned differently. (That is 9 in total) and present them in your sketchbook along with a brief description of what each set up is, what it is used for and how to set one up.
-
Your own self portrait, using composition, lighting and body language, to convey you as a person.
-
Create an in depth artist research of one experimental portrait artists. You must select one of them from the above examples, the second can be from the examples above OR you can find your own using the "links" page of this site.
-
Create your own practical responses inspired by your chosen artists and your own creative ideas and concepts.
-
Using more experimental studio techniques create a series of 3 images or more. Techniques such as gels, projections, shutter blur, flash blur, distortion through water, transparent surfaces, physical distortion of your image through traditional art methods.
-
Explore and experiment with different materials to discover how they can be used. Use brief notes to discuss their success.
-
A clear link to the artists and excellent visual quality are essential. Use the guide "How to present a shoot" in the "How to" link below.
-
Use your group to assist you in this process.
-
-
Introduce Rankin and his Destroy series. Select one of his celebrity pieces and break down the visual language in terms of what the original image, and the destruction, tells us about the person. Research the musician beforehand to see how this relates.
-
Present your plans for your own “Destruction” piece with notes on why you have selected specific sections. You can draw this or draw/add notes on top of your own image?
-
Create your own practical response, exploring you as a person, inspired by your chosen Rankin example and your own creative ideas and concepts.
-
Take your own "self portrait" using lighting, composition and in camera techniques to best portray yourself.
-
Print off two versions of your portrait. One to practice on and the other for your final outcome.
-
Using a series of different forms of physical manipulation "destroy" your image to better emphasise its ability to represent you, your identity and self to the viewer.
-
STUDENT SKETCHBOOK EXAMPLES.
Here are some example of how past students have approached this topic.


STUDENT PRACTICAL EXAMPLES.
Here are some example of how past students have approached this topic.


